Sourdough starters can be purchased online or you might even have a friend or relative who’s already making them who’d be willing to share. They’re easy to pass around, and you can use just a small amount to grow as much as you want! That’s the beauty of sourdough.
To grow your own, you don’t need anything more than flour, water, and time. Let’s begin!
What you need:
- a mason jar or similar sized glass or plastic container, no metal
- measuring cups and spoons
- plastic wrap
- flour (at least a pound to be safe)
What you do:
- Combine 3/4 cup of water with 3/4 cup + 2 tbs flour and stir vigorously in your container. Once bubbles are formed and you have a nice, thick, evenly combined batter, cover with plastic wrap and set on your counter. It will need to be placed somewhere that is warm, at least 70 degrees F, where it won’t be disturbed.
- Over the next 24 hours, bubbles should start to appear. During this period, stir the mixture occasionally to attract more yeast and air into the starter. The bubbles mean the yeast is becoming active and alive, that’s what you want!
- On the third day, its time to feed the yeast! Add another 3/4 cup flour and 3/4 cup water and stir vigorously, then cover and let sit once again.
- On the fourth day, your starter should be noticeably bubbly and have doubled in size. You will also notice that
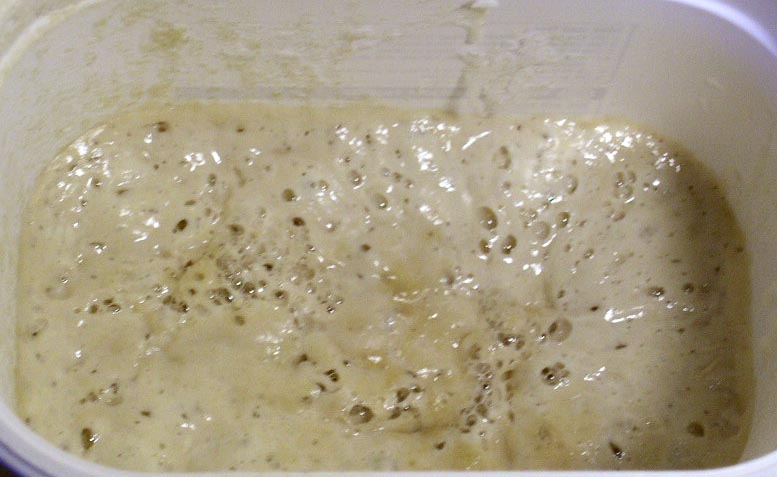 very distinct sour smell that is signature to sourdough. It is active when it is light with many big bubbles, like
in the photo. - If your starter is not this active yet-don’t worry! Just keep feeding it, it might just need another day or so. Every climate and local yeast available is going to be different.
- If your starter is ready-you can use it! Take about half out and use in a sourdough recipe of choice. Just make sure to add the same amount of flour and water back to your starter. Let it become active again, and either continue to reuse, or put it in the fridge to be “dormant”. Just make sure that if you do want to do this, that it is active before adding it to the fridge, and also don’t put an airtight top on it-or it might explode! You can put a sealed top on it after a few days, but let it breathe at first.
And your done! What’s your favorite sourdough recipe?
If you like this, you might also like:
17 thoughts on “How to Make A Sourdough Starter”
Can you use a gluten free flour for the sour dough reciepe.I need to make it gluten free bread .
Try with brown rice flour
does that work? what about organic flour like Tom’s Redmill?
is there a typo, don’t you need to start off with some yeast? or later is says you pick it up from the air when stiring the mixture? Mick
mick: You don’t need yeast–that’s one reason this is something people in past centuries could make almost anywhere. Yep, bacteria from the air provide the necessary action.
NO, not bacteria. . .a “unicellular fungi. The precise classification is a field that uses the characteristics of the cell, ascospore and colony. Physiological characteristics are also used to identify species. One of the more well known characteristics is the ability to ferment sugars for the production of ethanol. Budding yeasts are true fungi of the phylum Ascomycetes, class Saccharomycetes (also called Hemiascomycetes). The true yeasts are separated into one main order Saccharomycetales.”
If you want more info click on the site in the sources.
Source(s): http://www.yeastgenome.org/VL-what_are_yeast.html
I lived in San Francisco and loved the sour dough bread from fisherman warf. Very fond memories.
I am interested in a gluten free version.
Plz send me fresh emails …..not to to Spam
Have ever tried the reciepe with gluten free flour .does it work. Please reply
The first time that I tried to make a sourdough starter, I followed similar directions as you’ve given. My flour was fresh, all-purpose Gold Medal.
By the 3rd day, there were worms in the starter.now, my house is very clean, maids come once a week and I’ve never had meal moths in my pantry.
What could have caused this horrible thing to happen?
I tossed the whole mess and hadn’t thought about making any again until I saw your email. Any explanation/advice would truly be appreciated.
Thanks.
Marty
I am no expert, Marty, but the only thing I can think of that would cause this would be eggs in the flour. No mill is 100% sterile nor is the wheat that comes in for processing. This has been done for many hundreds of years so it isn’t a new or untested idea. Try again with fresh flour.
Any wheat/corn products such as flour, cornmeal, cereals, etc. potentially have insect larvae in them when they are packaged. Putting these products in the freezer, still in their packaging, will kill any larvae and eliminate worms, moths, etc. I normally leave the bags or boxes in the freezer at least two days before I place them in my pantry.
It may be that the flour had been close to expiration. It happened to me once.i never noticed anything when I measured the flour, then after sitting out, I noticed them and tossed the whole bag.
Thanks very simple and easy instructions sourdough is FANTASTIC
I attempted to make the starter and followed the directions, but on the fourth day, all the water was on top and when I stirred it, it was so watery. So I added a little more flour to thicken it a little and go again for another day…when I made the bread it didn’t rise like it should of but I baked it anyway and it was so heavy and doughy, i sliced it very thin to toast and the sour was good but heaviness was to much what happened??
Freeze the flour for a few days first before using. I soak fresh whole grapes in the first water added for about 4 hours and then remove them before I start the procedure. Works well. I believe that the natural yeasts on the skins of the grapes (noticeable as the whitish blush on the fresh grapes) are wild and grow well withthe procedure given above. Many other fresh and dried fruits can be employed as well.